Pages

Wednesday, March 30, 2016

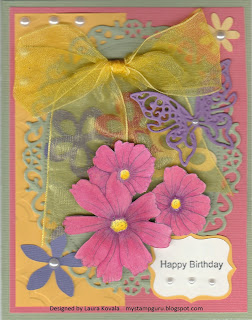
FEMININE SPRING BIRTHDAY CARD IDEA


Welcome everyone! I enjoyed spending time with my grandchildren for a few days over the past week, then was hit hard with influenza..... I am now feeling close to normal again, I'm happy to report, and I'm wishing all of my readers good health while this bug is running rampant (at least in my neck of the woods).

I managed to make this card over the weekend, which was inspired by the current challenge at The Outlawz Tuesday Color Challenge. The main image is "Cosmos," by Digistamps4joy, which I've colored pink/purple with Spectrum Noir markers. The butterfly & oval die cuts are from Spellbinders, and the little flowers are Cricut cuts (Mother's Day Bouquet). The yellow cardstock was embossed with a Darice embossing folder. I chose to add a few pearls & some wide sheer yellow ribbon just to fill in the bare spaces.

I hope this card helps to inspire your creativity today! Head on over to the The Outlawz Challenges and check out all the fun challenges this week for more inspiration! Smiles, Laura

Wednesday, March 23, 2016

TAIL FEATHERS BIRTHDAY CARD IDEA


Welcome everyone! I will be taking a short break from blogging to spend time with my grandchildren over the Easter Holiday. I'll be posting again on March 30th. But before I go on break, I thought I'd share a birthday card I made for a friend!

This cute image and sentiment are from a digi set called "Tail Feathers" from +Pickled Potpourri . I colored the chick in with alcohol ink markers, then fussy cut & matted on black CS. I also fussy cut and matted the sentiment on black CS. I stamped "Happy Birthday" with black ink, then used a Darice chicken wire embossing folder on the pink background, and layered this on black CS. The flower brads were attached using my Crop a Dile Big Bite. After attaching the chick and sentiment, I attached to the yellow card. The last step was to apply Yellow Stickles glitter glue to the "Happy Birthday" sentiment and set aside to dry for a half hour!

I hope I have helped to inspire your creativity today! Happy Easter to all, and I'll be back nest Wednesday! Smiles, Laura

Tuesday, March 22, 2016

EASTER CARD IDEA


Welcome! Today's share is an Easter card I made for The Outlawz Challenges Tuesday Color Challenge, using a bunny image from Digistamps4joy. If you're not a member of The Outlawz Challenges, check it out - it's a fun community of stampers who are not only nice, but very talented & creative! http://outlawzchallenges.ning.com/   If the link isn't working, please copy & paste into your browser.

The colors for the challenge are pink, blue & yellow! I'd love to see your Easter creations, so head on over to The Outlawz Color Challenge & upload your work - it's free to join & participate in the fun!
Smiles, Laura

Monday, March 21, 2016

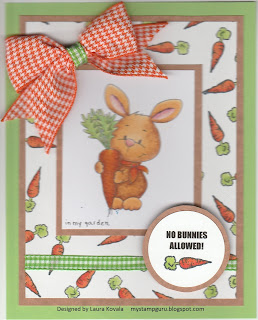
CARROT BUNNY GARDEN CARD


Welcome everyone! Today I'm sharing a garden note card I made for the +Gerda Steiner March Monthly Challenge, using Gerda's "Carrot Bunny Digital Stamp." If you haven't been to this site, check it out, there are lots of cute digis & ideas there, in addition to the challenge!

I colored the bunny image with Spectrum Noir Alcohol Markers, layered in on light marbled brown CS and hand wrote "in my garden". Next, I stamped the carrot background on white CS, colored it in and layered that on light marbled brown CS, after attaching the green gingham ribbon at the bottom. Then I attached this to a light green card.

I printed the "NO BUNNIES ALLOWED!" sentiment on the computer, punched it with a circle punch, then stamped & colored in the carrot. Finally I made the orange gingham bow, taped the green gingham ribbon around the center and attached to the card! I'm using this as a note card, but it could also easily be used as an Easter card - just change the sentiment!

I hope I've helped to inspire your creativity today! Smiles, Laura

Sunday, March 20, 2016

HAPPY EASTER BUNNY FAMILY!


Welcome! With Easter only 1 week away, I have been fervently working away in my craft room trying to finish making all my Easter cards for family. And today's share is hot off my table! Okay, let's get started on this card, inspired by the fact that RABBITS DO MULTIPLY quickly!

The bunny image is called "Nerdy but Nice" from +Gerda Steiner ! Each of the bunnies was cut out with scissors by hand, then colored in with Spectrum Noir Alcohol markers. I used Icicle Stickles glitter glue on the glasses to give them that shiny, reflective look (and let them dry for 1/2 hour).  After they dried, I used glue & tape to position & attach all 10 of them to the turquoise CS, then trimmed that by hand to mat my not-so-little bunny family!

I cut the pink strip of CS with scalloped scissors, then punched 1/16" holes with a hand punch, then attached this to a strip of turquoise CS, trimmed again with scallop scissors and tied a big puffy bow from white sheer ribbon before adhering to the tan background, which was embossed with a wicker embossing folder. I then layered this onto turquoise & pink CS, and finally to a 6" x 6" card.

Finally, I attached the "Happy Easter!" sentiment to the card with pop dots, and added the little self-adhesive pearls & flowers.  I have to admit, it was a bit more work than I normally do when I have a lot of cards to make, but one down and three more to go - there's still time before Easter to get them done!

If you have any questions about how I made this card, please ask in the comment section below! I hope I have helped to inspire your creativity today! Smiles, Laura

OH MY! MY HAPPY EASTER BUNNY FAMILY CARD HAS BEEN FEATURED
IN THE OUTLAWS MAIN GALLERY THIS WEEK! WOOHOO!


Saturday, March 19, 2016

MEMORY BIRTHDAY CARD IDEA
for Little Girl


Welcome! I made this card for my 8 year old granddaughter's birthday! Whenever she comes over, we share a cup of coffee together (of course, hers is watered down). Sharing coffee is one of those memories she'll have of me forever, according to her! So I incorporated that memory into her card!

Today, try creating a birthday card for a particular person and capture a personal memory in the card!
Happy creating & I hope I've helped to inspire your creativity today! Smiles, Laura

Friday, March 18, 2016

BLINGY BUNNY EASTER CARD IDEA!


Happy Friday everyone! I've been creating Easter cards and thought I'd share "Blingy Bunny" with you today! The bunny is a digi by +Gerda Steiner and I had a lot of fun working with this image! Being very much in a "spring mood" today, I decided to celebrate with Stickles Icicle Glitter Glue and "blinged" almost everything on the card - The bunny (I think it looks SO COOL on the glasses), the Cricut cut flowers (Mother's Day cartridge), the egg and the border! And of course I needed to add some ribbon! If you have specific questions on how to make this card, please ask in the comment section below! I hope I've helped to inspire your creativity today! Happy crafting & Smiles, Laura

Wednesday, March 16, 2016

HAPPY ST. URHO's DAY!


Happy St. Urho's Day everyone! Here's my take on this Finnish Holiday! I do love working with purple & green. I was inspired by Wednesday Sketch at The Outlawz Challenges and hope this card helps to inspire your creativity! Smiles, Laura

Tuesday, March 15, 2016

SPRING BUNNY CARD IDEA
"Enjoy the Ride"


Welcome! Spring has arrived early in Northern Michigan - I just saw the first robins in my yard the other day! To celebrate, I'm sharing this little spotted bunny card! My granddaughter challenged me to make "A spotted card, like PUT ME IN THE ZOO!" (her favorite book lately). So here's my take on it! I hope I've helped to inspire your creativity today! Smiles, Laura
WHAT AN HONOR!


The Outlawz Challenges has asked me to be on the Tuesday Color Design Team!
This is the first card I've design for the group!
If you are a card maker, scrapbooker, paper crafter or rubber stamper, you need to check out this group - it's a free community of like-minded people who enjoy the same hobbies!
Here's their URL (copy & paste into browser):     http://outlawzchallenges.ning.com/

Happy St. Urho's Day! Happy St. Patrick's Day!
Happy Green Beer in General Day everyone!
(Methinks I'll go get meself a green cold one on Thursday to celebrate me good fortune!) LOL!

Monday, March 14, 2016

QUICKIE MASCULINE MOOSE CARD
Skill Level: Easy       Card Type: CAS A7


Welcome! Today I'm sharing a quick & easy masculine card - this took me about 25 minutes to make, including design time. CAS style (Clean And Simple) simply means an uncluttered card with lots of "white" space - that doesn't mean there must be a lot of white, just a lot of OPEN space. Let's get started on this card!

The pine tree is a digi I got from +Christina Hor (she's got some nice digis, check her page out). I printed it on confetti kraft CS and cut it to 2 3/4" x 3 3/4", then attached it to a piece of 3" x 4" green CS and added the maple leaf brads. Next I used the smallest die from Nesting Book Pages by Darice to cut confetti kraft CS for the sentiment, which is stamped in green ink (sentiment by TAC). I then attached this to a piece of green CS and trimmed the edges with scissors, leaving a 1/8" mat on all four sides. The moose was cut using Cricut's Wildlife Cartridge.

The light green Bazzill CS background was cut to 4 3/4" x 6 3/4". I attached 2 colors of 7 1/4" length gingham ribbon - 3/8" brown & 1/4" green. The brown was started about 1 1/8" down from the top of the CS, and the green was attached directly below the brown. Next, I placed the matted tree image on the left side of the background, leaving about 1/2" border along the top, bottom & side. Then I attached the sentiment in the upper right corner, as shown, and centered the moose in the bottom right of the open space.  I also attached a small 1 1/2" bow made with the green gingham ribbon, just above the sentiment as shown.

And the final step was to attach this to a medium brown 5" x 7" card front, and stamp a sentiment on the inside! I will be giving this one to my brother-in-law on his birthday.

As always, I hope I have helped to inspire your creativity today! Smiles, Laura

Sunday, March 13, 2016

"SUN SHOWERS"
SPRING NOTE CARD


Happy Sunday! I just love SPRING! It's arrived early here in Michigan's Upper Peninsula and I'm celebrating by sharing "Sun Showers" with you today! The tulips & sentiment are from TAC and the little "umbrella girl" is from +Red Rubber Designs .

To make the background, I started with light blue CS, then tore the light green CS, as seen in photo, and attached to the blue CS (the entire background with these 2 pieces measures 4" x 5 1/4"). Next, I stamped the tulips on the green CS with black ink, and colored the tulips & leaves. The sun was made by cutting a circle with a circle punch, then cutting 1/4 of the circle with a paper cutter, and finally using scissors to cut the "V" edges into it.

I stamped the "umbrella girl" on blending card with Memento Tuxedo black ink, colored in with Spectrum Noir alcohol ink markers, then mounted to orange CS (same color as the A2 card base). "Happy Spring" was stamped on white CS with black ink, cut into a cloud shape by hand, then lightly sponged with a bright medium blue ink. I attached this to a scrap piece of light blue CS, and sponged the edges with the medium blue ink again. Both the girl & the cloud were attached to the background with pop dots.

And the final touch, after attaching to the A2 card, was adding something to look like water. I chose Stickles glitter glue - wonderful stuff! I added small dots of Icicle Stickles on the cloud and in the puddle. And the raindrops were created by drawing raindrops with Turquoise Stickles! I set the card aside for about 1/2 hour to dry and it was done!

I hope I have helped to inspire your creativity today! Happy creating & smiles, Laura

Saturday, March 12, 2016

EASTER CARD RECIPE


Hello! Today I've got a soft pastel Easter Card RECIPE to share! Skill Level - EASY!

INGREDIENTS:

White CS - A2 card (4 1/4" x 5 1/2" when folded) & 3 1/4" x 4"
Pink CS - 4" x 5 1/4"
Pink & white ribbon - 6" length (I used a heart pattern, polka dots would work too)
Sheer white ribbon 7/8" - 7" length
Spellbinders Nestabilities Dies - Floral Ovals (2nd largest die)
Bunnies stamp - Spring Garden Stamp set, by Red Rubber Designs
Happy Easter Sentiment (TAC)
Memento Tuxedo Black Ink Pad
Spectrum Noir Alcohol Markers: PP1, PP2, CG1, CG2, IG1, IG2, Blender
Embossing Folder - Cuttlebug Anna Griffin Matelasse
Embossing Machine (I used my Big Shot)
Stickles Icicle Glitter Glue
Pop dots

DIRECTIONS:

1. Stamp "Happy Easter" with black ink in lower right corner of pink CS.
2. Emboss pink CS with Matelasse Folder & attach pink & white ribbon across center, as seen in photo.
3. Cut smaller piece of white CS with Floral Ovals die, then stamp bunnies image with Memento Black ink.
4. Color in image with Spectrum Noir Alcohol Markers, as shown in photo.
5. With PP2 Marker, color lightly the oval over the punched holes on the die cut (sorry, this did show up well in photo).
6. Attach colored oval to pink embossed CS with Pop Dots.
7. Attach finished piece to white A2 card front, then stamp sentiment on the inside.And the card is finished.

IDEAS: For a little variation, try changing the color of the background - instead of pink, try light blue, mint green, soft yellow or lavender. Or, try changing the color of the ribbon, add pearls or rhinestones, you decide....  I'd love to hear from you & see what you've come up with. I hope I've helped to inspire your creativity today!Smiles, Laura

Friday, March 11, 2016

MASCULINE LOG CABIN BUCK CARD IDEA


Welcome & happy Friday! I've got a fun masculine card to share today! It's a 5 x 7", but the images would easily fit on an A2 card also, with minor rearrangement. The images are from FSJ, the sentiment from TAC.

I created the woodgrain background by using a Darice 5 x 7" embossing folder. First, I tore all 4 edges of a 5 x 7" piece of craft CS. Next, I inked the embossing folder with burnt umber dye ink, placed my torn edge craft CS into the folder & embossed. To add depth to this, I sponged in a little terra cotta ink around randomly, & sponged the edges with this as well. Next, I attached this to a piece of medium brown CS, tore the edges and sponged edges with burnt umber ink. Finally, I attached the ribbon to the left side of the background as shown.

I then stamped the images onto white Spectrum Noir blending card, added a bit of color with alcohol ink markers, and cut out with scissors. Before attaching the images to the background, I lightly sponged the edges of these with terra cotta ink.Once attached, I added 2 leaf brads and 3 self-adhesive rhinestones, as seen in photo. I then attached this to a 5" x 7" card front!

Try creating a card similar to this one during the weekend, using supplies you have on hand! I'd love to hear from you & see what you've come up with! As always, I hope I've helped to inspire your creativity today! Smiles, Laura

Thursday, March 10, 2016

Passing Art & Creativity Down to the Next Generation

I've been teaching my 9 year old granddaughter Mika to stamp and make cards and I just had to share her VERY FIRST Alcohol Ink Marker Portrait (image by Fun Stamper's Journey)! We had so much fun spending time together last week, and it's so important to teach the kids to express themselves artistically! I personally love the red streaks in the hair!


I hope you've enjoyed this post! Hit the +1 button if you think 9 year old Mika's got talent!
Smiles, Laura
A LITTLE ST. PATTY'S DAY INSPIRATION


Here's a little inspiration for St. Patrick's Day! The digis used in both cards are from Pickled Potpourri. Can't wait to get my annual glass of green beer next Thursday!


And this little leprechaun below looks like he's had one too many glasses of green beer!


 I hope these card ideas inspire your creativity toady! Smiles, Laura

Wednesday, March 9, 2016

HOW TO MAKE A REALISTIC BRICK WALL BACKGROUND
Embossing Folder PLUS Ink Technique


Hello all! I had so much fun creating this card, I just had to share it today! This realistic brick background is easy to make in just a few simple steps. As this is a more complex card, I'll only be discussing how to create the background today. Please leave a comment if you'd like me to post a "RECIPE" for how to make the entire card!

You'll need to gather the following supplies:

Darice Brick Wall Embossing Folder
Embossing machine (I used my Big Shot)
Terra cotta CS (4" x 5 1/4")
White ink pad (I used Brilliance Moonlight White)
Dark brown ink pad (I used burnt umber)
Medium brownish-orange ink pad (I used cognac)
Medium grey ink pad
Sponges
*Q tip

To get the whitish-grey look to the mortar in the brick wall,  I applied white ink to the embossing folder BEFORE embossing. Open the embossing folder - the side with the print (Darice) has the RAISED mortar lines on the inside  - apply the white ink to this side by lightly tapping the pad directly on the surface until well coated. Next, place terra cotta CS into the folder on the side that does not have ink , close it, and run through your embossing machine! Upon removing the CS, you should see the white mortar lines indented into the terra cotta CS!

If the white lines are too light for your taste, adding more ink is easy. Pick up white ink with a Q-tip and drag over the lines until you achieve the desired look - it only takes an extra minute or two. NOTE: I've personally gotten the best results with Brilliance Moonlight White, I think it coats better, but I've also used white chalk ink  for this.

The next step is to create highlights and shadowing on the brick wall. I started highlighting with the cognac ink pad, picking up a little color with a sponge, then lightly dabbing this randomly 6 or 7 times on the brick background, Remember to dab lightly - you can always add more ink, but you can't remove it if it's too dark! IT'S OKAY TO GET A TINY BIT OF COGNAC ON THE MORTAR, just not too much!

Now its time for light shadowing. Pick up a little grey ink with a clean sponge, and randomly dab this lightly onto the background where there is no cognac 7 or 8 times. Here, it's okay to get a little more of the grey in the mortar lines, as they are inset & would naturally be a little more shadowed looking, as long as the ink is not too heavy!

To create darker shadows,  pick up a little burnt umber ink with a clean sponge. Very, very, very lightly dab this randomly 2 to 3 times in an area where you want a heavier shadow. If you look at the photo, you'll see I applied mine to the upper right corner (shadow from eaves) and the lower left corner (shadow from window) and just a smidgen where the vines are hanging in the upper left corner.

Finally, to finish off the background, I sponged around all the edges lightly with the burnt umber ink. This gives a little extra contrast when placing it on a lighter card base, such as the blue in the photo.
Now the brick wall background is complete & very realistic looking!

I hope I've helped to inspire your creativity today & have fun playing with this technique! Smiles, Laura

Tuesday, March 8, 2016

DRY EMBOSSED BACKGROUNDS
Skill Level: Easy          Card Size: A2

Hello! I'm so happy, I am listening to the first thunderstorm of the year - Yay! Spring feels like it's actually here and I've got some spring-like cards to share with you today to celebrate. In these cards, I want to show what a difference an embossed background can make in the overall appearance of a card. And you'll get to see a little of my design process!


Okay, so in the first card you can see I've got some cute puffy flower stickers, some ribbon, a pretty pink background and my birthday sentiment. I think its okay (my 3 year old granddaughter would LOVE this - it has STICKERS!) but it's really kind of boring & blah, nothing really "pops".


Now in the second card, you can see flower stickers, ribbon with birthday sentiment, and -- oooh, I'm liking it better already - a lovely mint chevron embossed background! Funny here, the mint color background does not match any of the stickers, but the chevron pattern detracts the eye from that fact, so it works. This card pops, I like it! My 39-year-old-and-counting-backwards sister-in-law would go BANANAS over this one!


In the final card, there are only two puffy flower stickers, no ribbon, 3 brads, the birthday sentiment AND an embossed pink background with a twist - I picked up white chalk ink with my brayer (Brilliance Moonlight White Ink would also work here) and lightly rolled it over the embossed pink surface! It really softened up the whole card and made it pop! Notice there is no ribbon & not much bling at all on this one, yet it is still an attractive card. I think I'll give this one to my mother-in-law --- because I LIKE HER, not because I don't, if ya catch my drift! LOL!

Try experimenting with your embossing folders & see what you can come up with! And be sure to stop in tomorrow - I'll be sharing another card using ink directly on the embossing folder. I hope I've helped to inspire your creativity today! Happy embossing & smiles, Laura

Monday, March 7, 2016

MASKED EASTER CARD


With Easter being just around the corner, I've started making cards for my grandchildren's baskets! The cute images in today's card are from a stamp set called Springtime Garden (I got it from TAC a few years back, but Red Rubber Designs sells it now). I've listed the basic supplies I used below.

X-Press It Blending Card - 3 1/4" x 4 1/2"
Medium Blue CS - 3 1/2" x 4 3/4" & 4" x 5 1/4"
Lt Orchid CS - 3 3/4" x 5"
A2 Bright Yellow Card (folded - 4 /14" x 5 1/2"
Spectrum Noir Alcohol Markers:
LV 1 & 2; HB 1 & 2; CT 1, 2 &4; DG 1, 2 & 3; BT 2, 3 &5; TB 1, 2 & 3; TB 1, 2 & 3; IG 1, 2, 3 & 5; BP 2 & 4; PP 2, 3 & 4; TN 2, 3, 4 & 6; GB 6 & 9; Blender.
Memento Tuxedo Black Ink Pad
Adhesive

I started by stamping the Bunny/Sign image with Memento ink on the blending card, then creating a mask for this image out of scrap copy paper. Next, I placed this mask over the stamped image and stamped the Birdhouse image to the left of sign & removed the mask. Then I began coloring with my alcohol markers! Here's a basic guide for my coloring:

For the birdhouse & sign - TNs & GBs      Leaves/Grass - DGs & BTs     Sky - TBs
Yellow Birds - CTs & GB6             Blue Bird - TBs              Bunny - IGs    
Purple Flowers - LVs, HBs & CTs       Pink Flowers - PPs & BPs   Blue Flowers - TBs

After coloring, I attached this to the matting, blue/orchid/blue, as shown, then attached to the front of the card. And finally I stamped the phrases in the sky & on the sign with Black Memento Ink and added the phrase on the inside!

Later this week, I'll be posting a masculine wildlife card & another polished stone card, to name a few! If you like what you're seeing on my blog, be sure to follow me with Google+, which is located in the sidebar on this page. And feel free to ask questions & leave comments! Thanks for stopping by today, I hope I've helped to inspire your creativity! Smiles, Laura


Sunday, March 6, 2016

SALE NEWS!

Hello again everyone, if you're looking for embossing folders, Consumer Crafts (www.consumercrafts.com) has a great sale going on NOW! Today is the last day for free shipping on orders of $25 or more AND they've got Darice embossing folders for only $2.00 each! Usually you have to spend $75 or more to get the free shipping, so this is an awesome deal! It's a great time to pick up those folders you've been thinking about, I'm headed there right after this post!

I highly recommend this site, I've ordered from here several times over the past 6 months - really fast shipping, good selection, great sales! Hope this info helps you out! Smiles, Laura
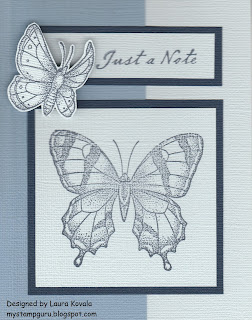
MONOCHROMATIC TECHNIQUE CARDS


Happy Sunday to you! The above card was in the Color Spotlight a few weeks back for a monochrome challenge, over at The Outlawz Challenges. If you haven't joined this site yet, you should! It's really a really fun group of creative people & terrific challenges- if the link isn't working, copy & paste into your browser http://outlawzchallenges.ning.com/

Okay, so monochromatic technique, in the strictest sense of the word, involves using ONE & ONLY ONE color on the entire card! If using only one color seems boring to you, or scary, let me assure you, it is neither of these! The secret to a great monochromatic card lies in the design.

As you can see in the blue card above, I centered the main image (large butterfly), but kept everything else on the card OFF-CENTER. Note that the medium blue CS in the background is wider than the light blue CS, the "Just a Note" phrase is stamped to the right of the label and the smaller butterfly is placed in the upper left corner, facing outwards, to the right. Also, the smaller butterfly is raised up with pop-dots, to add dimension and make the card more interesting.

Monochromatic, in a more liberal sense of the word, involves using MAINLY ONE COLOR, with just a little of another color added, as seen in the following card: mainly shades of purple, with a little white (my apologies for the crooked image).

Again, the secret to a great card lies in the design. Here I've used a medium purple background on a white card, dark purple matting around the image, purple & white in the main image, added a bit of sheer white ribbon, and stamped the phrase in purple. The ribbon adds texture & dimension, and tearing the purple CS to expose the white card makes the entire card look more interesting.

I hope you experiment with some monochromatic cards of your own! Some great color choices are greens, yellows, pinks, purples, blues, browns/tan, black/grey, reds & oranges. Have fun & I hope I've helped to inspire your creative side today! Smiles, Laura

Saturday, March 5, 2016

SPONGED MASKED GERBERA DAISY CARD

Uncolored flower
Q-tip colored flower

Hello & welcome! I've really got spring fever now & immensely enjoyed making today's card, which involves a few techniques - masking, sponged background & Q-tip coloring (seen in the second photo).

I started by creating a mask for the gerbera daisy image (TAC). To make a mask for an image, stamp the image on a piece of copy paper, then cut out right on the outer lines. Next apply Zig 2-way glue & set aside for 1 - 5 minutes to allow the glue to become tacky. (NOTE: Zig 2-Way glue is awesome - if you glue & attach immediately, it creates a permanent bond; if you glue & let it dry a few minutes, it creates a tacky, temporary bond, like a post it note!) While this was drying, I stamped the daisy image with navy ink on white CS (3 3/4" x 5") & cut dark blue CS for the matting (4" x 5 1/4").

After checking that the Zig glue was tacky, I placed the mask directly over the daisy on the white CS, ensuring the image was completely covered by the mask. I sponged a bright medium blue ink over the entire background. Next, I highlighted the daisy by sponging a pear (yellowish green) ink around the image only. Then I sponged the top & side edges with navy ink and tore the bottom edge, as seen in the photo.

At this point, I removed the mask and lightly sponged pear ink in the center of the daisy & over the leaves and stem - I know! I colored outside the lines!!! But really, it's okay here, the inside of the card says "COLOR OUTSIDE THE LINES!" For those of you who refuse to color outside the lines - USE A MARKER OR PENCILS TO COLOR THE LEAVES & STEM!

Okay, with this being jokingly said (smiles), we'll continue with the rest of the card! I attached the daisy image to the navy CS, stamped the phrase with Brilliance Moonlight White, and added a sheer white ribbon bow to the top. Next I attached this to a white A2 card front, and stamped "COLOR OUTSIDE THE LINES" on the inside with medium blue ink. And TADA! The card shown in the first photo is done!

To achieve the look in the second photo, I used a q-tip to pick up color from a light pink dye ink pad and colored in the petals of the flower with it. To create a shadowed look on the underlying petals , I applied heavier amounts of ink to darken these petals. Other options to color in the petals are using markers or pencils. The final step was to add the glitter glue for a little extra pizazz!

And now my craft room is calling me...... I hope I've helped to inspire your creativity today! Happy creating & smiles, Laura

Friday, March 4, 2016

MASCULINE MOOSE RETIFORM CARD


Here's the second card today using retiform technique - for instruction on retiform technique itself, refer back to my earlier post today. The colors I chose for this card were dark brown, medium reddish-brown, cognac (an orange-brown), and Brilliance Cosmic Copper, just to add a little sheen to the card. Also, the trees were stamped with dark green ink.

I started with white CS (4" x 5 1/4"). I masked the CS, leaving only the right 1/3 exposed, and lightly sponged in dark brown ink. I then repositioned the mask, leaving only the left 1/3 exposed, and again sponged in dark brown ink.

The top 1/3 was sponged in with the reddish-brown ink, and the bottom 1/3 with cognac ink, using the mask both times. Then I lightly sponged the edges of the piece with the Brilliance Cosmic Copper to soften the whole image a bit. At this point, the only white remaining was in the center, which you can't see, because I've stamped pine trees in dark green. And then I attached a label (white CS) after stamping "Birthday Greetings" with dark brown, sponging with Cosmic Copper and matting with dark brown CS.

Then I added the two moose, as seen in photo, then attached the piece to a dark brown A2 card front! The moose were made using my Cricut Wildlife cartridge and the labels with Cricut Elegant Edges cartridge.

Happy creating everyone! Smiles, Laura


BUTTERFLY RETIFORM TECHNIQUE CARD


Happy Friday and welcome! Spring is on my mind going into this weekend - the time of new growth, flowers, gardening & yes - butterflies! I thought I'd celebrate by sharing this retiform technique card with you today! I'm going to break this into 2 parts - first, the technique itself, and then making this card.

RETIFORM TECHNIQUE
The basic idea is to add color to certain parts of your cardstock, while leaving one area, usually the center, the original color (white in this example) to highlight your image or phrase.

Supplies:
*MASK - 1 sheet 8 1/2" x 11" copy paper, folded in half (I used paper from my recycle bin)
*3 or more different shades of inkpads - a dark, a medium & a light (I used Palette ink pads - Starry Night, Beaux Arts Blue & Chartreuse)
*Sponges
*White CS (cut to 3 3/4" x 5" in example above)

Instructions:
1. Place mask (folded copy paper) over the CS diagonally, leaving the lower right corner exposed. With sponge, lightly add dark ink (Starry Night), until desired shade is achieved. When you remove the mask, you should see a colored triangle in this corner - see photo above.
2. Place mask over CS diagonally, leaving upper left corner exposed. Sponge dark ink onto exposed area until desired shade is achieved. Upon removing mask, you should see another colored triangle in upper left corner.
3. Place mask over CS diagonally, leaving the upper right corner exposed - you'll see a little dark ink at each edge, this is great. Sponge on medium ink (Beaux arts Blue). Remove mask and reposition so that only lower right corner is exposed, again with a little dark ink showing, and sponge on medium ink. When you remove the mask, you should see a white diamond-like shape in the center!
4. Now its time for the light ink (Chartreuse, light green). Position your mask so that you will be sponging from the upper left corner down through the upper third of the right side - see where the green shade is in the photo? Now sponge on the light ink. Reposition the mask so that you'll be doing the same thing in bottom third of left side to just above the lower right corner - see green ink in photo again.
5. Congratulations! You've created a retiform technique background!

TO MAKE THIS CARD

Now that you've created the background, the rest of the card is easy! I used the negative from Spellbinders Les Papillions Two die as a stencil for the butterfly in the white center space (you could also stamp an image here if desired). I lightly sponged ink using this stencil placed over the white space (the same dark, medium & light inks used to create the background).

Next, I randomly stamped "Just Because" with dark ink and stamped the "flutter by" phrase above & below the stenciled butterfly with dark ink also. Because I wanted a soft look, I sponged the dark ink around all the edges, then attached this to dark blue CS (4" x 5 1/4") as a matting. I attached a ribbon bow to the left of the butterfly (if you are going to punch holes to tie your bow on, now is the time ).

I stamped "Get Well Soon" with black ink on white CS, lightly sponged the edges with dark blue ink for a soft effect, and attached it to the lower right corner with pop dots, as shown in photo. And finally I attached this to a light green A2 card front! The last step was draw in antennae for the butterfly - I used a light green glitter glue, but you could also use a marker or a gel pen.

I could have stopped here and had a beautiful card, but you know me, I love bling! So I added little Icicle Stickles Glitter Glue "dots" randomly on the card, and little "spots" on the butterfly! This step is, of course completely optional!

Okay, so now it's time for you to head to your crafting table & practice this technique. Try using different color combinations - pinks & purples, blues & purples, red & orange, the possibilites are endless & limited only to YOUR imagination!

I'll be posting another retiform card later today - check back this evening or tomorrow to see it!  I'd love to hear from you to see what you've come up with! I hope I've helped to inspire your creativity today! Smiles, Laura
Thursday, March 3, 2016

PURPLE SCRAPS QUICKIE CARD
Sill Level: Easy                Card Size: A2


Hello & welcome everyone! About once a month, I go through my cardstock scrap box and design a few cards from the choice selections the box has to offer me - kind of like my own little challenge to myself. This helps stop the scrap boxes from overtaking my craft room! And this is one of the cards I created using scraps this month.

I started with a white cardstock scrap - I used a file tab punch to create the tab, then stamped "Enjoy" on it in black and attached it to the narrow patterned paper scrap. Next, I attached this to a scrap of purple Bazzill CS, and added two silk flowers in a lighter shade of purple with brads, as shown above. With black ink, I stamped "Happy Birthday" and the little starbursts, to fill in some of the blank space. Then I mounted this to a scrap of black CS, leaving about 1/4" edge around the purple. 

At this point, I thought I was done and placed it on a white A2 card, but ultimately decided that there was too much white showing. I rectified this by adding another piece of purple scrap CS to the upper right corner behind the black matting, as seen above.

What kind of cute cards can you come up with? Try designing a few scrap cards of your own this week using up the scraps you've been accumulating! I'd love to hear from you and see what you've come up with! I hope I've helped to inspire your creative process today... Smiles, Laura

Wednesday, March 2, 2016

MASCULINE FAUX LEATHER WOLF CARD
with Wood Grain Embossed Background


Welcome back! Although most would consider this a masculine card, I originally made this rustic note card for a girlfriend of mine who loves nature, camping, hiking & fishing. I wanted to remind everyone that "masculine" cards aren't necessarily "just for guys" anymore - they can be for anyone with an outdoorsy spirit! This card uses the Faux Leather Technique with Liquid Applique - if you're not familiar with this technique, refer back to my February 20th post for the written tutorial.

The dye inks I sponged on the faux leather surface for the wolf & friend images were grey, dark brown & medium brown. I then stamped the images on with black dye ink and attached to black CS, as shown above.

The wood grain background was created with a Darice embossing folder and Big Shot. Next, I sponged a little grey ink around the edges of this piece, attached black grosgrain ribbon & matted images. Finally, I punched 3 holes & set black eyelets into the side with a Crop-A-Dile Big Bite, and attached to a black A2 card front!

Because the inside of the card is black, I used a silver gel pen to write the note. Another option would be to stamp your inside phrase with black ink on gray cardstock & attach this to the inside of the card. I hope I have helped to inspire your creativity today! Smiles, Laura

Tuesday, March 1, 2016

QUICKIE BRILLIANCE CELEBRATE CARD RECIPE
Skill Level: Easy                      Card Size: A2 Quickie


Happy March 1st everyone! Spring is just around the corner now, and with spring comes graduation parties, honors & achievements ceremonies, birthdays and more, so today's recipe is for a basic quickie card that will cover it all! See "ideas" below the recipe for tips on personalizing this card for your upcoming celebrations.

INGREDIENTS:

White CS: A2 Card (4 1/4" x 5 1/2" after folding) & 2 1/2" x 3 3/4"
Black CS: 4" x 5 1/4" & 2 1/4" x 3 1/2"
Brilliance Ink Pad - Pearlescent Orchid
Black Ink (for inside verse)
Celebration Stamps (by TAC)
Adhesive

DIRECTIONS:

1. In the center of smaller piece of black CS, stamp "It's your day to celebrate" with Brilliance Ink, then attach to smaller white piece of CS.
2. On larger piece of black CS, randomly stamp swirly designs with Brilliance ink, then attach matted phrase from step 1 in the center of this piece.
3. Attach to A2 card front, and stamp phrase with black ink inside card (not shown).

Note -  Brilliance pearlescent  inks look best on dark cardstock - it makes the ink "pop" and really gives your work a "rich" look - choose darker colored cardstocks when designing your card!

IDEAS: I chose my colors for a very specific reason - they are the recipient's favorite colors! When choosing a color scheme for your card, think about the following;
Graduation - what are the school's colors? Use those colors!
Birthday - what are recipient's favorite colors? Use those colors!
Remember to choose darker colors of CS when using brilliance pearlescent ink!

Also, if you have small die cuts that match the occasion, incorporate those into this card! For example, you could add a graduation cap die cut to a graduation card, balloons to a birthday card, etc.  Don't be afraid to play around with ideas -  get CREATIVE!!

As always, I hope I've helped to inspire your creativity today! I'd love to hear from you and see what you've come up with! Happy stamping, smiles, Laura