Pages

Wednesday, May 17, 2017

How to make HOME MADE SHIMMER MIST
plus BACKGROUND & CARD

Scroll to the bottom to see the card!

Hello everyone! I've been having fun making my own "shimmer mist" and thought I'd share this recipe with you today! It's hard to see in the picture, but when you spray this on paper or cardstock, this spray creates a beautiful, shimmering pearl effect after it dries!

YOU WILL NEED:
L.A. Colors Shimmering Loose Eyeshadow (purchased at Dollar Tree)
Warm water
Rubbing Alcohol
Clear Glue
4 ounce spray bottle

Remove sprayer top from bottle. Cut tube so that it will sit 1/8" to 1/4" off the bottom of the bottle (so that the mica powder doesn't clog the tube or sprayer tip).

Add 2 3/4 ounces of warm tap water.

Add 1 ounce of rubbing alcohol.

Add about 1 - 1 1/2 tsp. of clear glue (this helps the mica powder stick to the cardstock).

Add about 1/2 of a bottle of eyeshadow. On a piece of copy paper creased in the middle & opened, tap the upside down eyeshadow container onto the paper.These containers are oddly designed, so you will need to work at this, it will not come out easily. Once you have about 1/2 the bottle on the paper, fold the paper in half at the crease & carefully pour the eyeshadow into your spray bottle.

Put the cap back on and gently swirl the bottle round & round to mix well. DO NOT SHAKE! If you need to, take a swizzle stick to blend the glue at the bottom well.


These are the two shimmer mist background pieces I created to use in my card and the 4 shimmer mist sprays I made - purple, gold, pink & blue.

The larger piece is 4.75" x 6.75 inch white text weight paper. I sprayed the pink & gold randomly on this & dried with my heat gun. It is normal for the paper to curl as it dries. You can straighten it with a brayer or a warm iron later, or use as is!

The smaller piece is 4" x 5.25 inch 65# white cardstock. I wanted a distressed look for this piece, so after spraying with pink, gold, purple & blue shimmer mists, I gently crinkled up the CS into a little ball, then straighten out before drying with the heat gun. I thought it was too light the first time, so I repeated the process & I just loved how this one turned out after the second application!

THE CARD!


To make this card, I used a pink 5 x7" card. I attached the light pink shimmer paper, then the smaller multi-color piece on top of that. I added the Anna Griffin Butterfly (Anna's All About Him & Her Die Cuts) with pop dots, then cut the frame from white CS and attached with Zig glue.  Next I added the floral die cuts (All About Him & Her). I cut the "Happy" & "Birthday" from Anna Griffin's Wishful Thinking Dies and attached with Zig Glue. The final step was to add the pearls. This picture just doesn't do the shimmery effect justice!

As always, I hope I've helped to inspire your creativity! Happy stamping & crafting! Smiles, Laura

QUICK MONOCHROMATIC WEDDING CARD


Hello! Today I'm sharing a quick & easy A2 Wedding Card using the Monochromatic Technique! I've done this card in shades of teal, aqua & white, but you can can select any color range you like!  I used a white A2 card & Co'ordinations 12" cardstock, cut to 5 1/4" x 4" (the teal & white background on the card, so pretty!). Next I cut two white swirlies with Anna Griffin's Fretwork Dies #2 & white scrap cardstock. I attached these to the background with Zig glue, but you could also use spray adhesive.

I used Anna's new Sentiment Stamps & Dies set to create the 3D sentiment. I stamped the swirly design on light teal pearlized cardstock with black pigment ink. Next, I stamped "On Your Wedding Day" with teal dye ink on white CS. Then I used the coordinating dies to cut the gorgeous shapes out with my Big Shot. I used foam tape to attach the two pieces together, then attached to the card. The final step was to attach a sheer white bow in the upper left corner!

As always, I hope I've helped to inspire your creativity today! Smiles, Laura

Wednesday, May 10, 2017

BABY CARD using SPONGED BACKGROUND Technique


Hello again everyone! Sorry this post is late, was out of town longer than I planned, and yesterday was HSN Craft day, so I was glued to the television all day! But I did create this Baby card yesterday! It's using a technique called SPONGED BACKGROUND & it's a great technique when you can't find or don't have just the right cardstock on hand. There's nothing more satisfying than turning a plain white piece of cardstock into a colorful masterpiece!

SPONGED BACKGROUND TECHNIQUE:
You'll need white cardstock (I sponged the front of a 5x7 white card here) & a craft sponge (I cut mine into 6 or 8 triangular shaped pieces, like a pie) &  2 or more dye ink pads (I used a light blue and a light mint green). Gently blot up ink from the blue ink pad with a sponge, then dab & tap  the inked sponge randomly onto the white CS, leaving some white space for the 2nd color of ink. Then, with a clean sponge, do the same with the mint green ink, covering the white areas & dabbing into the blue in random areas. If you need to, go back over this again with the blue sponge, until you achieve the desired look. Finally, sponge the edges with the blue ink.

NOTE: You'll get different inked effects, depending on whether you gently tap or if you apply more pressure or if you rub the ink on a circular motion - have fun playing and experimenting with this!

THIS FRONT OF THIS CARD:
Next I used my Cricut to draw "Hello Baby" with Anna Griffin's Gracious Giftables Digi cartridge bonus content on white CS. I cut it down to 3 1/2" x 3 1/2" with the drawn sentiment centered, then sponged this & a 1 1/2" x 2 1/4" scrap of white CS the same way as the main background. I used Unity Stamp Company's "Just Stinkin Cute Add-on" to stamp the "Congrats on the cute new poop machine" sentiment with blue ink. Finally I hand drew the double stitching on both of these pieces and the card front.

I then randomly stamped the baby bottles on the card front with blue ink. Then I used an edging punch on both sides of a 1 1/2" x 7" strip of navy CS, before stamping stars on it with white pigment ink and attached to left side of card.

I attached buttons on the "Hello Baby" sentiment as shown, then attached to the card front. I used pop dots to attach the "Congrats" sentiment, along with a onsie die cut.

THE INSIDE:
I used Unity's "Just Stinkin Cute" stamp set for the inside phrase & image! The sentiment says "Sh*t just got real! Congratulations!"


As always, I hope I've helped to inspire your creativity today! Smiles, Laura


Thursday, May 4, 2017

SYMPATHY CARD IDEA


Today's share is a sympathy card I made using Anna Griffin products. The card base is white A7. I cut a piece of pink textured white core cardstock, embossed with Anna's Jolie Lace folder, then sanded to reveal the white core. I trimmed the bottom with scissors before attaching to the card front.

I made the sentiment with Anna's Chalkboard Sentiment stamps. I used Anna's Pink Pigment Ink Pad to stamp "With Sympathy" & "For the Graduate".  Then I trimmed a 1/8th inch border around the "With Sympathy" and matted on light pink CS, again trimming a 1/8" border around this and attached to the "For the Graduate" sentiment with pop dots. Next I trimmed a 1/8th" border around the graduate sentiment, and matted with light pink, white & light pink again, trimming each layer to 1/8th". I attached the sentiment to the card front about 3/8th" from the left side and 1 5/8th" from the top.

I printed & cut the roses with my Cricut & Anna's Fantastic Flipcards Digital Cartridge (bonus content), then attached to the card front with popdots. The final touch was to add the sheer white ribbon bow at the top of the card!

I won't be able to post again until next week Monday, as I'm out of town this weekend - I'm heading to the Spring Stampede in Sayner WI!!! As always, I hope I've been able to inspire your creativity! Happy Crafting, Smiles, Laura

Wednesday, May 3, 2017

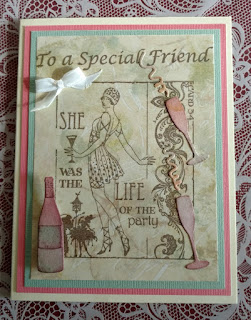
VINTAGE FLAPPER GIRL CARD


Today's share is a vintage A2 card that I taught in my class last night. It's a really quick & easy card to make. The image & sentiments are retired (TAC image, sentiment??), but you can use any vintage image you have on hand. I stamped both with Memento Rich Cocoa ink on a soft watercolor floral paper (4.75"x3.5") I got at Joann's. I matted this on light mint green CS (5"x3.75") & then pink CS (5.25"x4") before attaching to the cream A2 card front.

I cut the wine bottle & flutes from a leftover piece of watercolor cardstock I made using the Acetate Smack technique (see my post from April 23, 2017 for this technique) & then lightly sponged the die cuts with the Cocoa ink to give added dimension. I glued the flutes onto the card with Zig glue, and attached the wine bottle with pop dots.

The last step was to add the 1" white ribbon bow in the upper left corner to complete the card front. If you wanted to, you could also stamp a small "Happy Birthday" sentiment just under the image between the wine bottle & champagne flute. The inside of the card was stamped with a sentiment that says "IT'S WINE O'CLOCK SOMEWHERE!"

As always, I hope I've helped to inspire your creativity today! Happy crafting, smiles, Laura!

Monday, May 1, 2017

MASCULIINE GOOD LUCK CARD


Hello everyone! Today I'm sharing a masculine card that could be used for a graduation, or for a college-bound student. This card looks complicated, but it's really very easy to make.

CARD BASE:
The A7 card base is black (5x7" when folded in half). With white pigment ink, stamp a background pattern around the edges, then heat set the ink with heat gun. I've used Anna Griffin's Border Stamps diagonally in the picture above.

SHIRT & COLLAR:
Cut a piece of white cardstock to 4" x 6". Now, at 5/8" from the top of the card, cut in 1" at each side. Gently bend, but do not crisply crease or fold, the two partial strips inward & down to form the collar, as in the picture above.

TIE & COLLAR BUTTONS:
Using Anna Griffin's Embossing Folders for Him, I embossed the tie on red cardstock scrap, cut out with scissors, then used direct-to-paper technique to apply black dye ink to color the stripes on the tie. (Direct-to-paper technique involves gently dragging & tapping your inkpad on the cardstock/paper.) Attach to the center of the card about 3/8" from the top of white shirt with pop dots. Then gently bend 1 side of the collar over, poke hole through corner of collar, tie & back of shirt (I used my Spellbinders Tool-in-One to do this) & fasten with a gold mini-brad. Repeat this process on the other side of the collar.

POCKET:
Emboss the pocket from Anna Griffins "Dad" Folder (same set as above), cut out & attach to shirt with pop dots. Now attach the shirt to the card front, about 1/4" from the top.

EMBELLISHMENTS:
This is the easiest part! I attached die cuts with pop dots from Anna Griffin's "All About Him" set. All you need to do is finish the inside of the card as you see fit! And, Thanks Anna, for making such amazing die cuts, I love them!

As always, I hope I've helped to inspire your creativity today! Smiles, Laura